
Hey there! I’m so excited to share with you a few more details of our recent home renovation!
Just a heads up.. it’s a lengthy post. BUT, I’ve sectioned off each topic I’ll be addressing for your convenience. 🙂
So, we finally started the process of remodeling the garage a few weeks ago. It had been something we put all the way down to the bottom of our to-do list from the beginning but the more we waited to get started, the more we hated it. Also, I kind of get anxiety when I go into the garage. It’s not pretty in there.
-

- before
-

- progress
-

- almost done!
Anyway, I’ll tell you what is pretty… the rest of our house. I’m so excited about each space of the house because we’ve invested so much into every single detail. From building the kitchen cabinets to painting all the doors in the house. We’ve done it all.


actual proof, haha
This part of the renovation process was much anticipated. All the inspiration I had for the house was not being put to actual use and I was frustrated! So let’s pick up where we left off in “phase 1” of the process. If you haven’t read that post, go read it first (click here)!
Phase 2
Wall texture & color
Yes, texture. “What do you want your walls to feel like?” Was a question we got one day from our contractor. We were like ummmm what? Then he said “oh, the one that looks like orange peel is really in”. Great, another decision to make! If you know my husband and I at all, you know how particular we can be about the tiniest things. Yes, it’s annoying but we can’t help it! Which is why this darn house is not completely done yet. We take our time deciding every single thing. So we looked at different textures and decided to go with the simplest, flattest technique he could do, which was a version of this “orange peel” texture he had mentioned. Hah. After applying the texture he painted the walls and for us, this was such a turning point. We could really picture each room of the house. My favorite part was our accent walls. We knew we wanted a dark blue accent wall, but we couldn’t decide between two shades, Anchor’s Aweigh and Naval by Sherwin Williams, so we went with both. We went with two accent walls, one in the dining area and the other in our room. You might think we’re crazy for doing that (my mother-in-law sure did) but we loved how it turned out! We used Naval in our bedroom and Anchors Aweigh in the dining space, which is also the shade we used for our kitchen cabinet doors. For the rest of the house, we used a beautiful creamy shade of white called Alabaster, that was actually color of the year in 2016 (also from Sherwin). The ceiling, doors and trim got a regular paper-white shade of paint. You wouldn’t believe how many shades of white paint there are!
Tips to consider when painting a house:
People (including myself) usually don’t realize how much paint and painting a house can cost. We got lucky with our contractor, who did pretty much everything, and was okay with painting the house for a little more $. Be mindful of your budget and know that you have several options when it comes to painting your house! Obviously, you can go with a company (I advise to get a few quotes), you can hire someone to help you for the day, or you can do it yourself.
Look for sales. We got most of our paint from Sherwin Williams and the rest from Home Depot, who rarely has sales on paint. Sherwin, however, has a few major sales throughout the year, usually during holiday weekends like Memorial Day. We took advantage of one of these and I believe we got 40% off all of our paint. Also, it’s okay if you are not 100% sure about the color. You can purchase the buckets of paint on the day of the sale and go back to have them put in the color you choose when you’re ready. Just have your receipt. 🙂
Anyway, these were the colors we chose and a few before/after pics.
 oh, what a difference paint makes!
the living area
-

- before
-

- after
the master bedroom (got a bigger window):
-

- before
-

- after
Windows
Who knew windows are such an important part of a renovation process! As I mentioned in the other post, we swapped out two windows for two sliding doors in the main living area, and the rest of the windows had to be replaced. They were so old and we desperately needed new ones. To replace the rest of the windows we, and by that I mean my husband, measured and re-measured the size of the old windows so we could order new ones exactly the same size. We seriously thought windows were a standard size for the most part. hah, little did we know! We actually spent a few Sundays tackling this task because no, windows are not a standard size! We went to a few builder supplies warehouses in search of windows that matched the size of ours, but didn’t have much luck. If your house is a new build, which means you’re building the house from the ground up, the windows they sell at these places can work for you! In our case, getting a cheaper window would end up costing us more because we would have to make other changes to fit the size of the new window. In our master bedroom, for example, we decided to swap out a tiny awkward window for a much larger one. This required additional work on the exterior part of the house. For that window the changes made sense, but not for all of the windows in the house! So, aside from looking at the windows these stores had available, we got a few quotes on the “custom” ones we needed and, finally, purchased them from Surplus Building Materials. If you’re not in the renovation business, you may not know that there are a bunch of supply stores open to the public. They carry pretty much everything you might need for your house like tile, bathtubs, doors, sinks, you name it. We visited so many stores all around the city, but to this day I can’t name one store without googling it’s location first. They all have such similar names!
Here are some of the ones we visited (click names for their website): Seconds & Surplus , Surplus Building Materials, Builder’s Surplus, Surplus Warehouse … I told you they all sound the same! 🙂
-

- before
-

- after
-

- before
-

- after
Floor
A year and a half ago, when we were busy watching every episode of Fixer Upper, we thought we knew exactly what type of floor we wanted. Hard-wood floor. We knew it was expensive but we also knew this was the very best option. Now that I think about it though, I feel like this was such a biased choice, since all the episodes of Fixer Upper show Chip and Joanna ripping out carpet and swapping it with nice, shiny, wooden floors. Well, we quickly backed out of this option as we made a list of pros and cons. The cons quickly outweighed the pros, with cost being at the top of that list. They are pricey. So we started looking at other options and went with laminate floor. We knew we wanted the same type of flooring throughout the entire house and we liked the way hard-wood floors looked, but price was a concern for us. We also wanted to consider every single option. For a second we even thought about having concrete floors. For a second, I repeat. We weren’t crazy about regular square ceramic tiles, no matter how pretty, so we focused on getting that hard-wood floor look we wanted. We realized that nowadays you have several options if you want to achieve that look without the hefty price tag. There’s engineered wood (a little less expensive than regular wood floors), laminate, vinyl, and ceramic tile that looks like wood. I was almost convinced to get the ceramic tiles, but I’m so glad I stayed strong and went with laminate. The result was out of this world. We’ve been living in this house for almost 6 months now and I have no complaints. The floors always get so many compliments, so we’re happy with our choice. 🙂
-

- before
-

- after

Tile
Deciding what tile to get for three different areas of the house was probably the hardest thing I had to do. I looked everywhere for inspiration and did everything possible to stay away from boring patterns. I wanted our house to have a simple, modern look, with a unique feel. Which, I suppose might be everyone’s goal when renovating a house, but I also had to consider cost. The tile I always gravitated towards was marble but it’s so expensive. I must have gone to 100 different stores that sold tile, some I’m sure were only for contractors and designers, and I still had trouble deciding what to get. I was hoping to find the impossible: tile that looked expensive for a fraction of the cost. Doesn’t that sound too good to be true? Hah! Well, I was determined to find it! I can’t tell you how many times I wanted to give up and go with regular subway tile in the kitchen and bathroom, but my amazing husband was always there to push me back up and say “no, you can do this, let’s keep looking”. So long story short, we found most of our beautiful tile at Floor & Décor and splurged a little on our black hexagon tile from The Tile Shop. If you want to find nice, affordable tile, I recommend these two stores. They have pretty much all the fancy marble tile you see at all the other expensive stores AND the nice affordable ones as well.
These made the cut (no pun intended)


master bathroom


guest bathroom
Bathrooms
Before knowing we had to get rid of every wall in the house, we knew the bathrooms would need a huge makeover. The bathroom in the original master bedroom looked much like a 1960’s bathroom that had never been renovated, and the guest bath looked like it got a little work done in 2001. So basically they were both a hot mess. Although, my dad would argue that the renovated bathroom could work for the time being, I wanted every room of the house to flow. So, to my convenience I guess you can say, we took out every single wall in the house and started from scratch. Let me tell you, there is no better feeling.
The master bath was originally the guest bath with access to the hallway. This is the one that was a little renovated. We closed that hallway door and instead opened it to our now master bedroom. The layout remained pretty much the same to avoid plumbing issues, but then we realized we had to re-do all the plumbing in the house anyway. Hah! Either way, the layout worked for us. We got rid of the tub, switched out the vanity and got a new toilet.
We did a little more work to the guest bath, which was actually the master bath at first. We closed the door to the now guest room and opened a door to the hallway. This bathroom was so tiny and awkward that the small changes we did to it really made a difference. We also expanded the bathroom a little by taking the closet space that was initially in the room we combined into our master bedroom. This allowed us to add a tub in place of the small shower and overall give the bathroom a more spacious feel.
To bring our visions to life, I had the help of the online Ikea room planner (click here to see). Because we decided to get both of our bathroom vanities from here, as well as other accessories, using this application was super helpful. We were able to input the exact room measurements and lay out each piece in the bathroom exactly how we wanted. One thing we weren’t crazy about, however, was the options they have for the drawer fronts of the vanities. They do have several options, which is great, but none of them really “fit” our style. So, we ordered door fronts from Semihandmade, a company that has a ton of different doors especially made to fit Ikea cabinets. They have several color options for the Godmorgon vanity (the one we got in our bathroom), but we went with their “DIY Slab”. This one came in a natural wood color, ready to be stained or painted. Which by the way, was probably the most tedious painting task I had to do in the entire house, but I’m so happy with the results, so it was all worth it!
Okay without further ado, here are some pictures of the bathrooms…

master bathroom before

the plan


after
______________________________
guest bathroom


before

the plan

after (this is not the final one!)
Kitchen
Let’s talk kitchen. When people say kitchen is the most important and expensive part of any renovation, they are completely right. Don’t underestimate the cost of the kitchen, no matter how simple you think the project is! I want to say we had some fair expectations for the kitchen when we started the process. The house originally had a tiny kitchen with a wall blocking it from the dining space, making the kitchen look even smaller. We immediately knew this would be the first wall to go down, and if everything went well, we would replace it with a kitchen island. Lucky for us, that’s exactly what happened.
-

- wall
-

- and…
-

- no wall
Not having a pantry was another tiny issue we had, which I think was a pretty easy fix. We made space for it by getting rid of two doors, one of which led to the backyard and the other to the garage. With there already being two sets of sliding doors, it didn’t make sense to have another door to the backyard anyway. That space ended up being our pantry space. 🙂
-

- two doors turned into
-

- pantry space
For the cabinets and most of the doors & fronts, we went with IKEA. We have always been fascinated with their designs and their wide variety of options so we knew we had to at least give it a try. We researched everything related to the quality, installation, price, etc. and were quickly convinced they were a great option. In the midst of our research, we also learned about their kitchen sale, which happens twice a year I believe. Actually, I feel like it’s been happening a lot more often! They just had one a few weeks ago. During the sale you can get a 15% or 20% discount from the total price, depending on the amount of your purchase. This also includes countertops, which is where we got ours! They have several options for countertops, including quartz, the one we purchased. (I’ll get into countertop details in a future kitchen post)

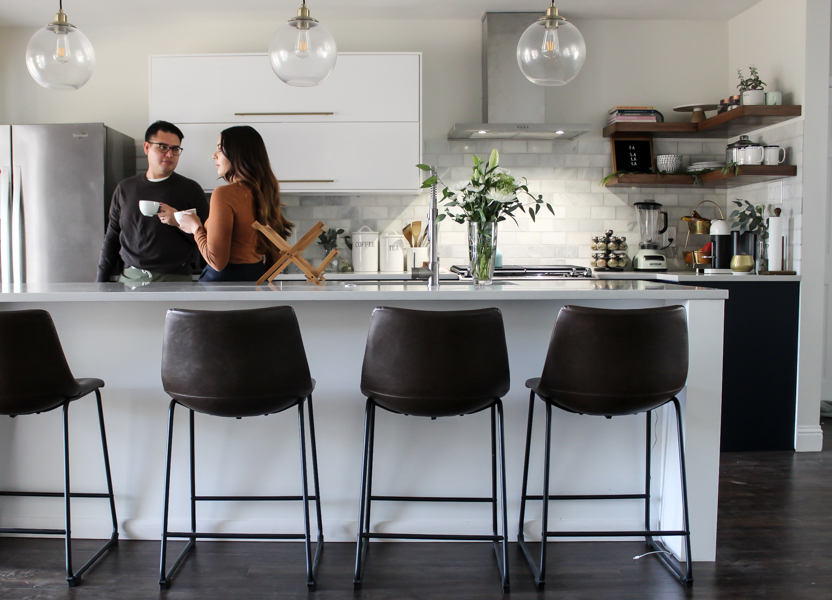
an almost done kitchen!
ps. Their quartz countertops are Ceasar Stone, which we found out is one of the leading brands in the countertop world. wohoo!
My favorite part of this kitchen process was being able to design everything ourselves using their design portal. We measured everything out, used all the inspiration we had, and designed away. It really helped us visualize what the kitchen would look like, and even gave us the total price for all the items on our list. For the modern, DIY individual, this is like a dream. Irving and I like figuring things out on our own, so being able to figure out what worked for us in terms of design and price, at the comfort of our couch, was perfect. When we were ready to purchase, we made a trip to IKEA. By the way, prepare to spend a few hours at the store when you make this special trip, even if you have everything planned out. I’m glad they have a café, cause you wouldn’t want to miss a meal. 🙂 Anyway, we did end up spending a few hours at the store getting everything in our kitchen design perfected. We were lucky to get help from a very knowledgeable designer who gave us great recommendations and let us know of details we needed to consider before ordering everything. So, I want to say this part of the reno was a breeze, mainly because we enjoyed designing the kitchen so much. Building and installing wasn’t that much of a breeze, but we managed! We had every single box in our kitchen order delivered and yes, as you can imagine, it was a lot of boxes. For a second we even considered having someone build & install the kitchen, but decided against it. Building the kitchen cabinets is much like building a dresser or bookshelf from IKEA. I know it’s not for everyone, but for us it made sense. Also, I like to think that the money we saved we got to use on appliances, which means I got a nice stove. 🙂


To personalize our kitchen (even more) we purchased some of the door fronts from Semihandmade (the same company I mentioned earlier). We originally wanted all the doors from IKEA, but we really wanted our kitchen to pop. So, we decided to purchase the DIY Shaker doors from Semihandmade for the bottom cabinets and we painted them a nice, dark blue (Anchor’s Aweigh from Sherwin). They stand out so nicely, I’m obsessed! Anyway, I can’t wait to share even more details of our kitchen reno, so stay tuned!

a sneak peek of our finished kitchen
I really hope you enjoyed reading about our renovation process. There is so much information on here and way more I didn’t get to share on this post, but I promise I will share more info and better pictures!
As always, thanks for stopping by!


3 Comments
Wow your house turned awesome after the renovation!! LOVE IT!!!
I live in Dallas area too, and planning to make some changes at my house, can you tell me the contractors you used? They did a pretty good job in your house. Thank you.
Thank you so much Shirley!! Glad you liked it! We did a lot of the work ourselves with the help of my husband’s dad who’s an electrician and now more of a do-it-all! But we did have a contractor that did all of the reconstruction, wall installation, etc. Would you like his number?
Yeah it would be great if you can give me their number 🙂
And how much did you spend for opening a new window in the bedroom?
Thanks so much!!